About this deal
Cut all the cabinet parts (parts A – G) and band them with hardwood edging (S – W). I used maple. When gluing on the edging, I used masking tape to hold it in place until the glue set, though there were some stubborn spots where I needed the extra force of clamps. The edging has two purposes: It protects the edges of the MDF, which are prone to chipping and denting, and it just plain looks good when the router table is finished. The table allows you to have both hands free for gripping the board, controlling the pattern, and achieving the desired result. Stopped Cuts Also, the fact that you can get the feather board closer to the router means greater accuracy. They’re useful for delicate jobs such as edge forming, rabbeting, and grooving. There are many different router bits to choose from. Select one with a profile for the cut you want to make. It might be a straight cutting bit, one that cuts a groove such as a cove bit, an ogee, or guide bearing. Safe, convenient switch The external switch lets you switch your router on without opening a cabinet door. When making stopped cuts, you can even switch it off with your knee, leaving both hands free to hold the workpiece. The switch is optional; you can use the switch on the router.
A router is very handy for a variety of projects, both decorative and functional. You can use it for a range of trimming and cutting tasks, and it’s incredibly portable.
You use a T-slot to safely and accurately position your cuts for fast and precise results. Raised Panel Doors
Now you’re more familiar with the types of router tables and their component parts, it’s time for me to give you a step-by-step guide to setting your table up. Practical extras might include a digital readout attachment, remote power switch, and other accessories. Benchtop You attach a router bit to a router table using a collect. Before you fit the bit into the collet, make sure your router is unplugged from the power supply or remove the battery. The most used feature is the table top. More often than not, the top is MDF or Medium Density Fiberboard. This material is denser than plywood, another common table top material, but it is denser and therefore sturdier and more durable. MDF is also one of the more affordable materials. For the more experienced woodworker, a full router table system comes with all the bells and whistles. It’s a table that includes advanced features for more complex projects and delivers precise and top-quality results.
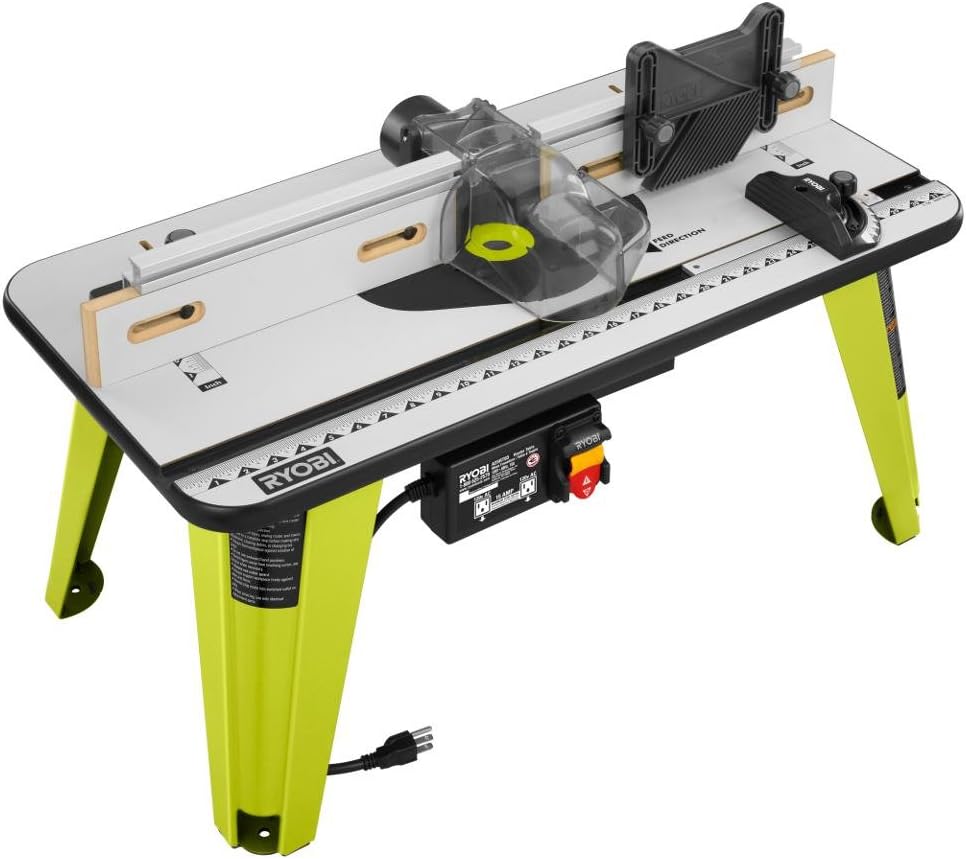
The tabletop
You have several options when it comes to the fence of your router table. It is the feature that keeps your workpiece in place when you’re cutting. To control the cut, you press your workpiece against the fence as it advances past the bit. Assemble the cabinet box, and then install the drawer slides and doors. “Wrap” style hinges make the doors easy to hang and adjust. For straight cutting bits, you adjust the fence from the front. Use a ruler across the bit’s center and rotate its cutting tip towards the fence. Adjust to ensure it’s the right distance away and then secure the fence.
Double dust collection Vacuum ports in the cabinet and fence provide suction both above and below the router bit, making this router table one of the cleanest machines available. Stand-alone legs or a cabinet support a workstation of this style. One bonus with a cabinet style table is that you get extra storage space underneath your workstation. Use it to store your router, various bits, and accessories. Full Router Table System The plate is generally machined aluminum, but it might also be solid phenolic aluminum. Both materials are sturdy and hard-wearing. Start with small cuts and get in some practice before moving on to more significant projects. How to Use a Router Table – 6 Common Uses I hope you’ve enjoyed this introduction to using a router table. With practice, you’ll soon appreciate the benefits of having one and be able to work more efficiently.If, however, your projects will be more heavy-duty and long-lasting, a tabletop made using phenolic resin will be more rigid and stable. Another option if you’re looking for durability is cast iron. Lots of options are available to make sure you have the right base plate. For example, you can get one-size-fits-all, pre-drilled plates, and blank plates. Fence The base plate is what you use to attach your router to the table. It fits into a slot on the top of the table, and ideally, it should be perfectly flat. A router mounted on a table does some things better than a handheld router: In some situations, it’s simply faster and easier to push wood across a router than to push a router across the wood. In other situations, a sturdy table and fence give you more control and accuracy.
In my beginner’s guide, you’ve learned how to use a router table. You’ve also been introduced to the different parts of a router table, how to set one up, how to feed wood into the table, and many of its various uses. Think of the top like a sandwich. The MDF core (D) is the meat and the 1/4-in. hardboard (N) is the bread. Here’s the recipe: First, glue one layer of hardboard (cut about 1/2 in. larger than the final size) to the MDF core (Photo 2). I pressed the parts together using a slab of MDF as a platform, 2x4s and clamps. This is a complicated glue-up, and I strongly recommend that you make a dry run complete with all the clamps first. A standard router table is popular with woodworkers of all skill levels. It’s a little bigger than a compact table and suitable for a wide range of woodworking projects. Essential features will include a flat top and base plate, T-slots and miters, a sturdy base, and simple to secure fence. Floor Standing or Cabinet Style The plate must be compatible with your router and fit rigidly and level to the table. Many tables have a leveling system. It allows you to make adjustments to ensure the plate is balanced and secure to help get a perfect fit. There are certain cuts that a fence won’t work for. On these occasions, a starter pin is what you use.
The fence base and rail will come from one piece of MDF. Cut this blank to 8-5/8 x 32 in. and drill a 3-in. hole in the center with a jigsaw or hole saw. Rip the blank in half and you’ve got both parts, perfectly matched (Photo 6). Important: Before you screw in the middle shelf, measure the height of your router and make sure the shelf location will allow you to remove the router motor from the base. I placed the shelf 12 in. from the top, but your router might require more space. This may also change the height of your drawer parts. If you need to make a further adjustment, draw a line with a pencil on the table next to the fence. If you loosen the left end of the fence, you’ll be able to pivot it closer or farther away. Tighten it up when you think it’s right and make another test cut. Step 6: Workpiece Feeding
 Great Deal